Followers

Showing posts with label Hawker Food. Show all posts

Monday, June 15, 2015

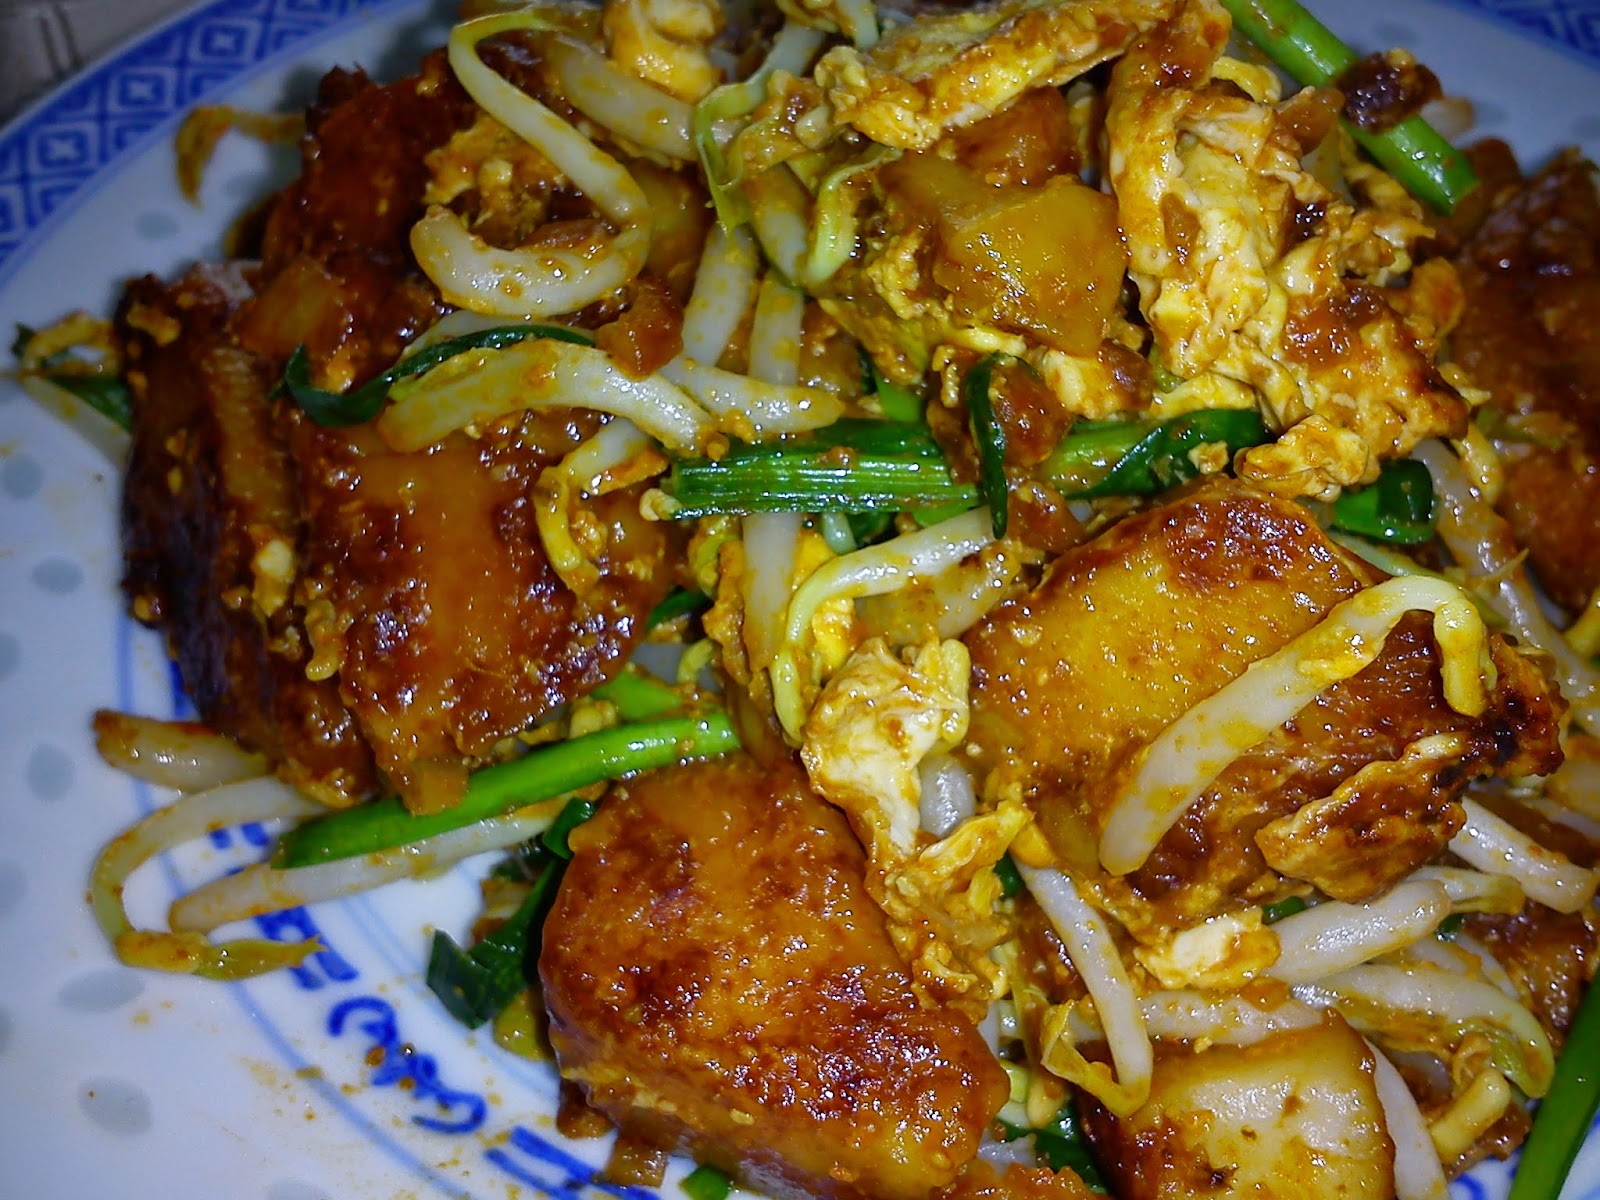
CHAR KOAY KAK [FRIED STEAMED RICE CAKE]

Char Koay Kak [Fried Steamed Rice Flour Cake] is a dish quite similar in way to Char Koay Teow, Char Sago Kuih and some other stir fried noodles using the basic ingredients like beansprouts, chives, eggs and preserved radish [chai por]. But this is not as oily as Char Koay Teow as fresh koay teow basically is already oily. The steamed rice flour cake has no fats in it.
Seen this lovely recipe in a 2015 calendar distributed to customers by Tiga Gajah Cho Heng Sdn Bhd, Penang. I have tried several of their recipes such as Kuih Kosui,  Steamed Pumpkin Kuih [aka Kim Kuah Kuih]  and Steamed Yam Cake [Or Kuih].  All have turned out to be good. 
The pictures here, simply taken is enough to show that it is indeed yummy-licious. I could enjoy the pieces of Koay Kak  [rice cake] and the taste and texture are just perfect. 
Using a non-stick wok to fry, it is hassle-free and yet the result is a plate of fragrant Char Koay Kak. I believe, this dish will be even better if  I use pork lard and duck’s egg, hehehe!. I will definitely try next time. 
The portion here is enough for 4 persons but for great eaters like my family members, it is only enough for 3.  Even a friend who watches her diet had a 'big' plate.
Recipe Source from Tiga Gajah Cho Heng Sdn Bhd, Penang
Ingredients for Steamed Cake
125 gm rice flour
50 gm wheat starch
730 ml water
  1. Mix all ingredients together and strain through a sieve. Set aside to soak for 2-3 hours [I soaked for about 2 hours while I went for my morning exercise].
  2. Pour soaked flour mixture into a steaming tray [5-6 inch tin].  Stir to cook over boiling water [medium low heat] until batter thickens [takes about 10 minutes]. Then steam for 50-60 minutes.
  3. Remove and leave to cool for at least 5 hours before cutting into smaller pieces [I left it overnight].
Other Ingredients for Frying
3-4 tbsp cooking oil [less if using a non-stick wok]
5 cloves garlic – chopped
20 gm chai por [I used 20 gm each of the sweet and salty chai por] – rinsed and drained
½ tbsp chilli paste [I used 2 tbsp cos’ I like it more spicy]
2 eggs [ I used 3 large eggs]
50 gm beansprouts [I used 300 gm – tailed]
40 gm kucai [I used 100 gm] – cut 1 inch lengths
Seasoning [combine]
1 tbsp light soy sauce
1 tbsp water
1 ½ tbsp dark soy sauce
1 ½ tbsp fish sauce
½ tbsp oyster sauce
1 tsp sugar [optional]

  1. Heat oil in a non-stick wok, sauté garlic until aromatic, add in the steamed rice cake, spread them out a little.  Leave to cook for awhile without stirring to brown the pieces.
  2. Add in the chai por, seasoning sauce, chilli paste and lightly stir to mix the ingredients well. Leave to cook for awhile so that the steamed cakes are firm and a little charred.
  3. Lastly add in the eggs, then throw in the beansprouts and chives. Stir fry to mix until cooked through.
  4. Dish up to serve immediately.

I'm sharing this post with Cook Your Books Event #24 [June 2015] hosted by Joyce of Kitchen Flavours
Cook-Your-Books

Tuesday, May 19, 2015

EZCR #4 - HOME-MADE SCALLION PANCAKE [ 葱油饼]

According to Wikipedia, scallion pancake [葱油饼-cōngyóubǐng] is a Chinese savoury, unleavened flatbread folded with oil and minced scallions [green onions]. Unlike Western pancakes, it is made from dough instead of batter. Variations exist on the basic method of preparation that incorporate other flavors and fillings.
Surprisingly, scallion pancakes are my nephew’s favourite. Used to make these pancakes for him but it was quite a while since I last made them for him. Recently, he commented that it has been a long time I didn’t make him these pancakes.
With Ching Ming over and having some free time, I made these pancakes for my nephews.  The best part is, I didn’t have to fry them for him.  I need only to prepare until Step No. 6  and he takes over the rest when he wanted to indulge in these crispy, fragrant and tasty pancakes.  He loves these pancakes a little more salty, peppery and with lots of spring onions/scallions.  This I fully agree with him.


The pancakes can be made individually or as a whole log then cut into smaller pieces.  If you have the time, it would be better to make them piece by piece according to the size that you prefer.

Ingredients
[makes 12 medium size or 24 small size pancakes]
600 gm plain flour or Rose flour
100 gm spring onions or more - washed, drained and cut small cubes
Some oil for brushing [2-3 tbsp]
Some salt to taste
Some pepper to taste
¾ cup hot boiling water
¾ cup cold water
Some toasted sesame seeds – optional
  1. Put flour in a mixing bowl, add hot boiling water and quickly stir with a pair of chopsticks to mix until flour looks like coarse bread crumbs.
  2. Fix mixer with a dough hook, add in cold water.  Knead dough until smooth, then add in a little oil.  Continue to knead until soft , smooth and shining. 
  3. Sprinkle dough with some flour and shape into a ball, cover  to rest for at least 30 minutes.
  4. Knead rested  dough to release air bubbles.  Divide into small portions.  This dough can be used to make Chinese Pancake with sweet paste filling too [click here to see recipe].
  5. Roll each portion into a rectangle, spread evenly some oil over surface, sprinkle a little salt and pepper followed by spring onions.
  6. Roll up dough into Swiss roll style, seal the edges then roll into a circular disc.  Finish doing the same for the remaining dough.
  7. Heat a non-stick pan with oil.  Flatten the scallion pancake and fry it till crispy on one side, flip over to fry the other side until crispy.
  8. Remove and place fried pancakes on absorbent paper.  To serve, cut pancake into smaller pieces.  Serve immediately with chilli sauce.
Notes:
Can keep individual dough pieces in separate greased plastic bags in the fridge for 2 days before frying.
Pancakes can be pan fried till cooked but not brown then bake in oven at 200 degrees C for 7-8 minutes before serving.

Friday, May 15, 2015

SUPREME PORK CHOP

One easy yet tasty pork chop recipe which my niece commented 'this is really good'.  
Honestly, I had the same opinion after biting at it but waited for the others to comment.  I do concur with my niece's comment as I wanted to eat another piece after the first.
I suggest to marinate the meat much longer, best overnight in the fridge for the meat to absorb the flavours well.  Instead of pork chops, I used pork tenderlion.  I pan fried the meat slices instead of deep fried.  Whichever way, the option is yours.  Do increase the sauce ingredients if you prefer more gravy.

Verdict - tender, soft, juicy and tasty fried pork slices that goes well with fragrant sauce.  This dish is good with rice or fried potato wedges and salad or  freshly cut vegetables [zuchini and tomatoes].
Recipe Source - adapted from Hawker's Flair Simplified
Ingredients
600 gm pork chops 
200 gm cornflour for coating before frying
Marinade
1 tbsp oyster sauce
1 tsp each sugar, salt and sesame seed oil
2 tbsp plain flour
1 tbsp custard powder
1 tsp bicarbonate soda [I omit]
200 ml water
Sauce Ingredients [combine]
1 tsp curry powder
1/2 tsp salt
1/2 tbsp sugar
1 tsp light soy sauce
2 tbsp tomato sauce
1 tbsp chilli sauce
1 tsp Worcester sauce
6 tbsp water
  1. Cut pork chops or tenderlion into 1 cm thick pieces and lightly pound with a meat pounder to tenderise the meat.
  2. Add marinade, mix well and season for at least 30 minutes [or overnight].
  3. Coat pork chops with cornflour before frying.
  4. Deep fry or pan fry pork chops until brown or cooked through.  Dish and drain.  Place on serving platter.
  5. Combine sauce ingredients and cook in a wok until thick. Add in fried pork chops to coat with the sauce or pour sauce over pork chops.
  6. Serve immediately with salad or freshly cut vegetables. 
I submitting this post to Cook Your Books Event #23 [May 2015] hosted by Joyce of Kitchen Flavours


 photo 77951578-1914-4b72-8eda-9e40a91183ac_zps331eb4b4.jpg

Tuesday, May 12, 2015

PANDAN KUIH KOSUI [KUIH LOMPANG]

In the previous post, I shared a recipe on Palm Sugar Kuih Kosui [click here] which is an easy to follow recipe and it's good.
Since the last kuih kosui that I made wasn't enough to share, I  used the recipe below to make another batch with pandan flavour  that yields slightly more.  Basically the steps are the same and I'm grateful to Wendy for her generous sharing of useful tips. This time I tried steaming the kuih in plastic cups [is it healthy?] but it is much easier without having to grease or heat them before filling up with the batter.  You can use porcelain teacups or stainless steel moulds, too but remember to grease them.
The kuih is soft, chewy, very aromatic and the natural green colour comes solely from the pandan juice.  No colouring is added.  As stated in my previous post, a good Kuih Kosui should have a dent in the centre as seen in the photo here.

Ingredients
[makes  40 teacup size kuih]
140 gm rice flour
60 gm green bean flour 
400 ml water
1 tsp alkaline water
Pandan Sugar Syrup
180 gm castor sugar 
200 ml water
6-8 blades pandan leaves [I used 15]
Toppings
200 gm freshly grated white coconut
1 tsp salt to taste
  1. Mix rice flour and green bean flour with 400 ml water and leave to soak for 1-2 hours.
  2. Blend pandan leaves with  200 ml water.  Extract the juice.
  3. To make the pandan sugar syrup – boil the sugar with pandan juice in a saucepan. Stir until the sugar dissolves , cool before use.
  4. In a mixing bowl, combine flour mixture, cooled syrup and alkaline water. Stir to a smooth consistency. 
  5. Strain the mixture into a big measuring cup and add water to get 960 ml batter.
  6. Pour ½ [about 500 ml] mixture into a saucepan or non stick wok and stir cook over low heat until the first streak of gel is seen in the base [make sure you stir to the base of the pan] . Batter should be watery.
  7. Off heat, mix the warm batter with the other ½ portion, mix well.
  8. Prepare steamer, lightly greased the steaming cups [if using porcelain or stainless steel moulds]. Stir the batter well before pouring into the cups until 60% full [the batter will spill over if it is too much upon steaming].
  9. Steam over high heat for 15-20 minutes.
  10. Allow kuih to cool completely before removing from cup with a plastic knife.
  11. Serve with grated coconut.
    I'm submitting this post to the Best Recipes for Everyone May 2015 Event (Theme: My Favourite Desserts) organized by Fion of Xuanhom's Mom and co-hosted by Aunty Young 

Monday, May 11, 2015

PALM SUGAR KUIH KOSUI

A popular kuih with various names like brown sugar kuih kosui, gula melaka kuih kosui sometimes aka Kuih Lompang.  There is also the green colour type made with pandan juice [see tomorrow's post].  It is also called steamed rice puddings.  Whatever it is, most people would know that this kuih has grated white coconut to go with it and it is the coconut flakes that makes Kuih Kosui even more yummy-licious.  It can also be steamed in a steaming tray then cut into squares with a coat of grated coconut.
My hubby loves having something sweet like home-made cookies, kuihs, sweet soups or cakes as dessert after dinner.  This is one of them.

I don't know why I have the urge to try Nyonya kuih recipes, now. Long ago, I won't make kuihs that have coconut or coconut milk in them, thinking that it is unhealthy to consume too much of it and of course, sugar.
Nowadays, I don’t bother cos’ after all I’m not eating all of them, hehehe!. There are many people around that I can share them. I'm happy just to taste a little will do…hope I can control myself.  This kuih is quite addictive, you won't stop at one.
I noticed that for this kuih, some recipes stated to cook the batter and some don’t. On safer side, I tried the warm batter method cos’ I remembered my late great aunt used to do that and she makes very good Kuih Kosui for sale then.  I was even more convinced prepare it this way after reading Wendy's post on pandan kuih kosui.  Hers look so pretty and I like the quantity of sugar she used [only 90 gm]. 
According to this recipe from the book ‘Nyonya Flavours’, the batter is not heated but the steaming cups are heated for 5 minutes before the batter is added [I skip this step].  I followed part of Wendy's method [Step 5 and 6] which is more similar to my late grand aunt's.
Anyway, the kuih turns out well. It is chewy [QQ] and there is a hollow dent in the centre. Was told that a good Kuih Kosui should have this feature.  My looks messy, probably because I pour in too much batter.
Recipe Source – Nyonya Flavours [modified]
Ingredients
[makes 16 teacup size kuih]
70 gm rice flour
30 gm green bean flour [2 tbsp]
200 ml water
½ tsp alkaline water
Gula Melaka [Brown Sugar] Syrup
50 gm sugar [I used brown sugar]*
70 gm palm sugar [Gula Melaka]*
100 ml water
100 gm freshly grated white coconut
1/2 tsp salt to taste
* can reduced to 90 gm in total if you prefer it less sweet
  1. Mix both flours with 200 ml water and leave to soak for at least 1-2 hours.
  2. To make the brown sugar syrup – boil the sugar, palm sugar and pandan leaves in a saucepan. Stir until the sugar dissolves . Cool before use.
  3. In a mixing bowl, combine flour mixture, cooled syrup and alkaline water. Stir to a smooth consistency. 
  4. Strain the mixture into a big measuring cup and add water to get 480 ml [16 oz] batter.
  5. Pour ½ the mixture into a saucepan or non stick wok and stir cook over low heat until the first streak of gel is seen in the base [make sure you stir to the base of the pan] . Batter should be watery.
  6. Off heat, mix the warm batter with the other ½ portion, mix well.
  7. Prepare steamer, lightly greased the steaming cups. Stir the batter well before pouring into the cups until 60% full [the batter will spill over if it is too much upon steaming].
  8. Steam over high heat for 15 minutes.
  9. Allow kuih to cool completely before removing from cup with a plastic knife.
  10. Serve with grated coconut.
      I submitting this post to Cook Your Books Event #23 [May 2015] hosted by Joyce of Kitchen Flavours
    photo 77951578-1914-4b72-8eda-9e40a91183ac_zps331eb4b4.jpg
      I'm submitting this post to the Best Recipes for Everyone May 2015 Event (Theme: My Favourite Desserts) organized by Fion of Xuanhom's Mom and co-hosted by Aunty Young