Followers

Friday, February 28, 2014

Hoisin Flavoured Roast Chicken Chop

Weekend meals - I just love easy cooking and prepare simple food for my family.  We 'cooks' do need a rest to 'charge' ourselves too, after we are all humans like the rest,  hahaha!   All work and no play makes Jane a dull girl.
This recipe was inspired by Redneck's Hoisin Chicken [here] which is roasting a whole chicken but I prefer roasting drumsticks or chicken chop [deboned chicken whole legs] as one whole chicken is too much for 3 persons.
This roast chicken is served with a tasty hoisin onion dipping sauce, steaming hot rice and some sliced cucumbers.

Again, another meal better to be served in my cosy little kitchen than eating out.  I think my hubby will like it, hehehe!  More economical of course [almost everyday I hear people [from sellers to buyers] complaining about rising costs of food.
Food verdict - my hubby says it's very aromatic, tasty and surprised when I told him, it's just Hoisin sauce, salt and honey.
Ingredients
[serves 3]
3 pieces chicken whole leg - deboned [either with or without skin]
- marinate with 1 tbsp Hoisin sauce and 1 tsp salt for at least an hour [mine is overnight]
Before roasting - rub over the skin and meat with:
1 tbsp each of honey and Hoisin sauce
Dipping Sauce
2 onions - sliced
1 tsp chopped garlic
2 tsp oil
3 tbsp Hoisin Sauce
3 tbsp water
dash of pepper and Shaoxing wine [optional]
  1. Marinate chicken whole legs.
  2. Preheat oven @ 200-220 degrees C for 10 minutes.
  3. Before roasting, rub chicken pieces with honey and Hoisin sauce.  Roast chicken [skin side down] for 20 minutes, flip over and roast/grill the skin side for another 20 minutes or until the skin is nicely browned and slightly crispy. 
  4. Dipping Sauce - Saute onions and garlic until aromatic.  Add in Hoisin sauce and water.  Bring to boil for several minutes.   Serve hot or warm with roasted chicken, rice and sliced cucumbers or any salad.
Notes: Visit this site for Its' Nutritional Facts [here]

Thursday, February 27, 2014

Steamed Rainbow Sago Kuih

I have bookmarked this kuih recipe from Happy Flour for sometime.  Really easy to prepare, good as dessert or snack for parties and gatherings.  These kuihs are soft yet chewy and tasty.   Moreover, they look attractive in various colours.
I have to change the quantity for the ingredients used because this is the minimal quantity the vendors would sell.  Next round shouldn't be a problem as I'll make more especially if these are for gatherings.
The kuihs together with the mini purple Angku Kuihs [see this post] were prepared for a gathering.   They were so nice that several ladies approached me to ask whether I made them or are they from the stores.
Recipe Source - Happy Flour with some modifications
Ingredients
[makes about 20-22 pieces]
200 gm sago - soak for 15 minutes and drain well
100 gm grated coconut
80 gm sugar
1/3 tsp salt
60 ml coconut milk
food colouring of your choice
150 gm grated fresh coconut
1/2 tsp salt
  1. Mix soaked sago with grated coconut, sugar, salt and coconut milk.  Stir well to combine.
  2. Separate the sago mixture into different portions and add the colourings.  Mix each portion well.
  3. Fill greased moulds [I used teacups] with sago mixture until 3/4 full.  Smooth the surface with the back of a small spoon.
  4. Steam in a preheated steamer at high heat for 15-20 minutes [I used the electric steamer].
  5. Leave to cool before removing kuihs from the moulds.
  6. Mix grated coconut with salt and steam for 10 minutes.  Leave to cool and use it to coat kuihs before serving.
Notes: Visit this site For Its' Nutritional Facts [here]

Wednesday, February 26, 2014

Purple Sweet Potato Angku Kuih #2

This is a second recipe which I used to make more purple sweet potato angku kuihs for a family gathering at a health centre.  About 100 senior citizens  and their family members will be there each month for the food, fun and singing.  Usually it is potluck style and there are always ample food shared.  With a wide choice of food, I thought it would be good idea to make small cute little angku kuihs so that more people would try it since it is only one bite size piece and won't be too filling.
Many of them were tempted to try these little angku kuihs which weren't enough for the crowd as this recipe only makes about 50 pieces.
For this recipe, the ratio of sweet potato to glutinous rice flour is more than my first recipe [Purple Sweet Potato Angku Kuih#1].  The difference is the colour tone, it is a more vibrant purple colour than the first one which uses less sweet potato with the portion of glutinous rice flour.  Taste and texture is about the same as I used the same method.  However, I'm not too pleased with the print which is not distinct probably because of the mould and the angku skin in thin.
Another point which I would like to share here is - Angku kuihs using sweet potatoes don't keep long.  They stay soft for 2-3 days but by the second day, the kuihs aren't that fresh and the colour does change a little.  This fact was confirmed by a very experienced Angku kuih seller who has been making this kuih for several decades.  She prefers to use colouring if she intends to keep the kuihs for longer time.  She doesn't use preservatives.  I think the weather does affect too.  During this hot spell, it is better to finish eating the kuihs asap.
Recipe Source - Yum Yum Magazine No. 77 - method slightly modified
Ingredients - Mung Bean Filling
150 gm mung beans
80 gm sugar
1/2 tsp salt
2 tbsp oil
  1. Soak mung bean overnight and steam for 35-40 minutes until soften.
  2. Blend immediately into a fine paste.
  3. Heat a wok and fry paste with sugar, salt and oil.  If it is too dry, add in some water during the frying process.  Once the filling can be bind into a ball, then it is ready.  The paste can be prepared a day ahead and refrigerate until required.
  4. Set aside to cool.
Ingredients - Skin Dough [Weighs about 350 gm]
150 gm glutinous rice flour
100 gm purple sweet potato [steamed and mashed]
100-120 ml hot boiling water [more or less, don't add all in one go]
2 tbsp sugar
1-2 tbsp oil
  1. Mix all the ingredients [except the sweet potato] in a mixing bowl.  Stir with a wooden spoon to stir so that the flour can absorb the water [you may need more or less water depending on the moisture of the sweet potato].  Add in the sweet potato.  Bring dough together [at this stage the dough could be very sticky but it is alright.
  2. Then add in the oil eventhough the dough is lumpy.  Bring the dough together and knead into a soft dough [I suggest you use a mixer with paddle hook to do the kneading as the dough is quite sticky and difficult to manage until you may be so tempted to add more flour].
  3. Wrap dough in a plastic bag and rest in the fridge for 1-2 hours or even overnight [this way the angku skin will be stay softer and chewy for 2-3 days].
  4. Thaw and knead the dough again before use [if dough is dry add some water and if wet add some glutinous flour].

banana leaves [cut into number of pieces required - must be bigger than the cavity of the mould
Shaping the Kuih
  1. Divide dough into 50 equal portions [about the size of the kuih ee if using this mould] and roll it into a ball.
  2. Divide mung bean paste into 50 equal portions.
  3. With your thumb, make a hollow in the dough and shape it into a bowl [you may need to oil your palm to prevent sticking].
  4. Wrap filling in dough and seal the opening.  Place the kuih into a greased mould and press it to set the shape [must grease the mould every now and then for wooden moulds].
  5. Knock out the kuih and place it on banana leaf.
  6. Arrange kuih in a steamer tray [allow some space in between the kuihs].
    Steaming Angku Kuih
  1. Bring water to boil in a steamer.  Place tray on the steamer, steam kuihs for 5 minutes over high heat [depends on individual stove].
  2. Remove lid and continue steaming for 6-7 minutes or until cooked.
  3.  Notes: I used an electric steamer without preheating, steam kuihs for 10 minutes and open the lid several times during the steaming duration.
  4. Remove tray and brush surface of kuihs with oil [this allow the skin to absorb the oil while it's hot and give a shine to it].
  5. Remove kuih to cool on a wire rack [the print will be obvious when oil has been absorbed into the skin when it's cooled].


I'm sharing this post with Cook Your Books Event #9 hosted by Joyce of Kitchen Flavours


 photo 77951578-1914-4b72-8eda-9e40a91183ac_zps331eb4b4.jpg 

Tuesday, February 25, 2014

Purple Sweet Potato Angku Kuih #1

I made some Angku Kuih following Happy Flour's recipe Purple Sweet Potato Angku Kuih.  The angku kuih skin was not that difficult to make as I used the mixer with paddle hook to do the kneading.  The dough was easy to handle compared to using hand to knead [my next post] where the dough is very sticky as it uses boiling hot water.
For the mung bean filling, I modified slightly on the sugar and oil as I find the filling a bit on the dry side.  The paste is not sweet at all.
I used a 6-7 cm size Angku Kuih wooden mould [makes about 18 pieces].
The angku kuihs stay soft and chewy for 2-3 days.   During hot season, it is advisable to finish eating these kuihs as soon as possible as they won't keep long.
Recipe Source - Happy Flour
Ingredients - Mung Bean Filling
150 gm mung beans
80 gm sugar
1/2 tsp salt
2 tbsp oil
  1. Soak mung bean overnight and steam for 35-40 minutes until soften.
  2. Blend immediately into a fine paste.
  3. Heat a wok and fry paste with sugar, salt and oil.  If it is too dry, add in some water during the frying process.  Once the filling can be bind into a ball, then it is ready.  The paste can be prepared a day ahead and refrigerate until required.
  4. Set aside to cool.
Ingredients - Skin Dough [Weighs about 650 gm]
300 gm glutinous rice flour
100 gm purple sweet potato [steamed and mashed] - can use about 150-200 gm for deeper colour
280 ml water [more or less]
1-2 tbsp oil
  1. Mix all the ingredients [except water] in a mixing bowl.  Gradually add in the water and knead into a soft dough [you may need more or less water depending on the moisture of the sweet potato].  I used a mixer with paddle hook to do the kneading.
  2. Wrap dough in a plastic bag and rest in the fridge for 1-2 hours or even overnight [this way the angku skin will be stay softer and chewy for 2-3 days].
  3. Thaw and knead the dough again before use [if dough is dry add some water and if wet add some glutinous flour].
banana leaves [cut into number of pieces required - must be bigger than the cavity of the mould
[I made only 20 pieces as I prefer thicker angku kuih skin]
Shaping the Kuih
  1. Divide dough into 20 equal portions and roll it into a ball.
  2. Divide mung bean paste into 20 equal portions.
  3. With your thumb, make a hollow in the dough and shape it into a bowl [you may need to oil your palm to prevent sticking].
  4. Wrap filling in dough and seal the opening.  Place the kuih into a greased mould and press it to set the shape [must grease the mould every now and then for wooden moulds].
  5. Knock out the kuih and place it on banana leaf.
  6. Arrange kuih in a steamer tray [allow some space in between the kuihs].
Steaming Angku Kuih
  1. Bring water to boil in a steamer.  Place tray on the steamer,  steam kuihs for 5 minutes over high heat [depends on individual stove].
  2. Remove lid and continue steaming for 6-7 minutes or until cooked.
  3. Remove tray and brush surface of kuihs with oil [this allow the skin to absorb the oil while it's hot and to give a shine to it].
  4. Remove kuih to cool on a wire rack [the print will be obvious when oil has been absorbed into the skin when it's cooled].

Monday, February 24, 2014

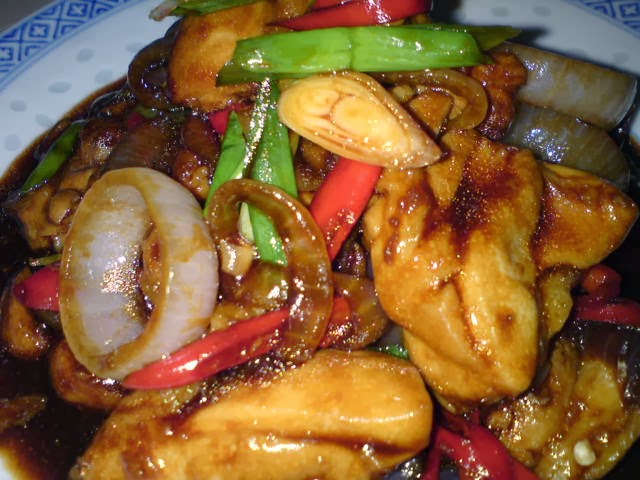
Fried Chicken With Sweet Dark Soy Sauce

This chicken dish looks very appetising and easy to prepare in a local food magazine.  Since the weather is getting quite unbearable, cooking a simple dish is best solution instead of 'sweating' in the kitchen with numerous dishes.  I served this dish with EZ Boiled Cubed Potatoes and another simple mixed vegetable salad [see this post].  All these make a yummy weekend meal at home, still better than 'dressing up' and eating outside....hehehe!
Recipe Source - Yum Yum Magazine No. 77 with slight modifications
Ingredients
[serves 3-4]
3 chicken thighs - deboned [keep or discard the skin] - cut bite size pieces
1 tbsp oil 
1 big onion - sliced
1 red chilli - sliced
some spring onions
50 ml water
Seasoning
2 tbsp dark soy sauce [can used sweet dark soy sauce and omit the sugar]
2 tbsp tomato sauce
1-2 tsp sugar to taste
1 tsp salt to taste
  1. Marinate chicken pieces with some salt, sesame oil and cornflour [can prepare this and refrigerate until required].
  2. Heat oil in wok, pan fry chicken pieces until slightly crispy and golden.
  3. Add in seasonings, onions and chillies.
  4. Stir fry over high heat for a few minutes until meat pieces are cooked.
  5. Pour in water and bring to boil [longer time if you prefer the gravy to be thicker].  Add in spring onions.
  6. Dish out and serve immediately with mixed vegetable salad.
Notes: Visit this site For Its' Nutritional Facts [here]
I'm submitting this post to Cook Your Books #9 Event hosted by Joyce of  Kitchen Flavours
Cook-Your-Books