Followers

Showing posts with label Aspiring Bakers. Show all posts

Friday, January 24, 2014

CNY 2014 - Fried Ngaku Chips [Arrowhead Chips]

This will be the last of my CNY delicacies that I'm making for this Chinese New Year.  I chose to make this specially for my late youngest brother, these chips were his favourite CNY snack.  Every year, before CNY he would buy plenty of these [sometimes until the supplier said 'no more stocks'] for my mum and his nephews.   He just loved watching them enjoying these addictive chips and would get the best for them irrespective of the price.   From now these fried Ngaku Chips will be a prayer item that we are offering to him during CNY eve prayers, huh!  We missed him so much.
I wasn't really please with how my chips turned out but these will suffice for now.
For more detail recipe, please hop over to Wendy and Phong Hong's blogs [Table For 2.... or more,  Phong Hong Bakes].
Basic Ingredients
Arrowheads/Brown heads/Ngaku
Oil for deep frying
Salt
  1. Rinse the arrowheads.
  2. Peel the arrowheads and soak them in a basin of water with some salt added.
  3. Drain and leave in a colander to dry.  Slice arrowhead.
  4. Heat oil in a wok, add in sliced arrowhead to fry until there is no more visible bubbling of the oil surrounding the chips.
  5. Remove with a serrated ladle and drain on kitchen towels.
  6. Store in airtight container when thoroughly cooled.
Notes on tips learnt from Wendy [copied from Phong Hong's blogpost]
1. According the Wendy, she did not dry the arrowhead slices and her chips turned out fine.
2. Drop the arrowhead slices vertically into the deepest part of the oil. It will sink at first and then rise to the top.
3. Don't overcrowd the chips when frying and make sure they don't overlap or they will stick together.
4. Be patient, wait until the chips are properly fried before removing from oil or else they will be soggy.


I'm submitting this post to Aspiring Bakers #39 theme - CNY Rock and Roll January 2014 hosted by Moon of Food Playground.

Wednesday, May 29, 2013

PUMPKIN BROWN SUGAR BUNS

This is a very popular steamed bun dough recipe which I noticed several blogger friends have tried and shared.  By chance, I came across the similar recipe in a food magazine [sorry, can't remember which one].  
These buns are very soft, fluffy and light.  I have made them into croissant shape with a sprinkle of brown sugar inside.  I wouldn't mind making these again especially when I'm not in the mood to prepare any pau fillings...  Fast and easy, lol.
Ingredients
[makes 16 buns]
250 gm pau flour - sifted
20 gm wheat flour
50 gm icing  sugar
50 gm pumpkin puree
100 ml water 
1/2 tsp vinegar
1/2 tbsp instant yeast
1 tbsp shortening 
some brown sugar
Using a Dough Mixer or Hand Knead
  1. Combine all the ingredients [except shortening] in a mixing bowl.  Knead until soft [about 5-10 minutes].  Then add in the shortening, continue to knead until soft, smooth and elastic.  
  2. Shape into a ball and cover to rest for about 30 minutes or until double in size.
  3. Punch down dough and remove dough to a floured surface, divide into 2 round balls.   Take one portion, roll into a rectangle, then cut into tall triangles.  Sprinkle some brown sugar on each triangle.
  4. Roll up each triangle into a croissant.  Place on parchment or greased proof  paper in the steaming tray.
  5. Leave to prove for 20-30 minutes or until double in size.
  6. Steam over high heat for 10 minutes in a steamer.  Off heat and leave paus for a further 3 minutes before uncovering to cool on rack. This is to prevent wrinkle, rough skin [sometimes  they may be a little wrinkle - probably because of proofing time but the texture is unaffected].
    Serve immediately or reheat before serving.
I'm sharing this post with Aspiring Bakers#31 - Bao Ho-Chiak -  May 2013 event hosted by Miss B of everybodyeatswell in Flanders.

Tuesday, May 21, 2013

PANDAN VEGETABLE PAUS

A very fragrant pandan steamed pau with vegetable filling [vegetarian stir fry turnip - see recipe here].  I didn't purposely cook this vegetable to make these paus.  Usually this vegetable is cooked in quite a big quantity especially during festive times.  I set aside a portion to use as filling for this pau.  
  
These paus are soft and fluffy.  Tasted savoury sweet.  
Ingredients
[makes 24 paus]
500 gm pau flour - sifted
100 gm caster sugar 
240 ml pandan juice/water [*] 
1/2 tbsp instant yeast
1.5 tbsp shortening [original uses 3 tbsp]
[*] 6 blades pandan leaves [screwpine leaves] - blended with 240 ml water - strained to obtained 240 ml pandan juice/water then add a drop of green colouring [optional]
1 tbsp double action baking powder
Filling - Vegetarian Stir Fry Turnip [recipe here]

Using a Dough Mixer or Hand Knead
  1. Combine all the ingredients [except shortening] in a mixing bowl.  Knead until soft [about 5-10 minutes].  Then add in the shortening, continue to knead until soft, smooth and elastic.  [Note: double action baking powder can be added after kneading dough until soft and smooth - this I believe is to prevent yellowish looking paus]
  2. Shape into a ball and cover to rest for about 15-20 minutes or until double in size.
  3. Punch down dough and remove dough to a floured surface, divide into 2 round balls.   Then divide each ball into 12 equal portions. Shape each into a ball, then roll into flat circle.
  4. Wrap filling with each flatten dough.  Gather the edges and shape into pleated paus or round balls.  Place on parchment or greased proof  paper in the steaming tray.
  5. Leave to prove for 15 - 20 minutes or until double in size.
  6. Steam over high heat for 10-12 minutes in a steamer.  Off heat and leave paus for a further 3 minutes before uncovering to cool on rack. This is to prevent wrinkle, rough skin [sometimes  they may be a little wrinkle - probably because of proofing time but the texture is unaffected].
I'm sharing this post with Aspiring Bakers#31 - Bao Ho-Chiak -  May 2013 event hosted by Miss B of everybodyeatswell in Flanders.

Friday, May 17, 2013

SESAME SWEET POTATO SAUSAGE BUNS

This steamed bun recipe is quite unique as it uses sesame oil instead of vegetable shortening or corn oil.  These sausage rolls have the nice aroma of sesame oil.  Soft, fluffy and moist buns that goes well with any fillings [maybe ham, cheese or luncheon meat].
Ingredients
[makes 10-12 pieces]
300 gm pau flour or plain flour
100 gm mashed sweet potatoes [I used purple sweet potatoes]
2 tbsp sugar
1/2 tsp salt
120-130 ml water
2 tsp yeast
3 tbsp sesame oil
1 tbsp white sesame seeds [optional]
some toasted black sesame seeds - for garnish [optional]
10 pieces chicken sausage - steamed for 10 minutes - set aside to cool
Using a Dough Mixer or Hand Knead
  1. Combine all the ingredients [except sesame oil and seeds] in a mixing bowl. Knead until soft [about 5-10 minutes]. Then add in the sesame oil, continue to knead until soft, smooth and elastic. Add sesame seeds and knead for 1-2 minutes to mix well.
  2. Shape into a ball and cover to rest for about 20-30 minutes or until double in size.
  3. Punch down dough and remove dough to a floured surface, divide into 2 round balls.   Flatten each ball and cut into 5 equal portion.  Shape each portion in long slender strips.

  4. Use a strip to wrap a sausage into a roll.   Place roll on a piece of greaseproof paper.   Place shaped dough in the steaming tray.
  5. Leave to prove for 15 - 20 minutes or until double in size.
  6. Steam over high heat for 10 minutes in a steamer.  Off heat and leave rolls for a further 3 minutes before uncovering to cool on rack.  This is to prevent wrinkle, rough skin  [sometimes they may be a little wrinkle - probably because of proofing time but the texture is unaffected].

                          Photos below show another way of shaping the buns.
    I'm sharing this post with Aspiring Bakers #31 - Bao Ho-Chiak - May 2013 event hosted by Miss B of everybodyeatswell in Flanders.

    Friday, May 10, 2013

    PURPLE SWEET POTATO SESAME STEAMED PAUS

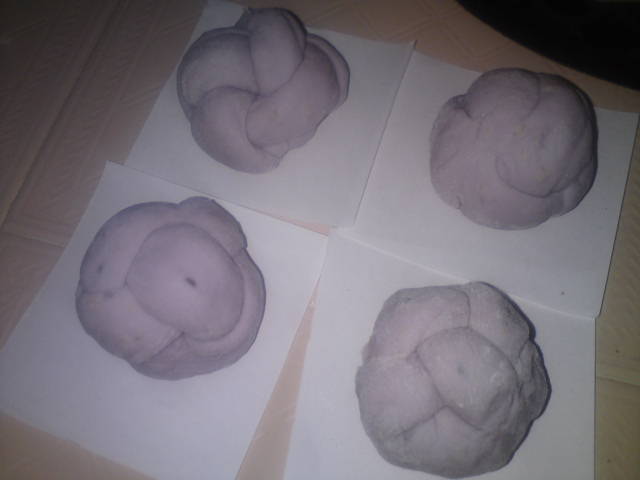
    This is an expansion of my 'sure can' pau dough recipe [see this post].  Expansion here means adding other ingredients to create another kind of paus.  They are just as good in taste, texture and looks.   Here, I added purple sweet potatoes.  

    I tried shaping the dough into various shapes according to my 'whims and fancies'.  I believe you can too once you have master the art of pau making using this dough recipe.  To make things easier for myself, I just use store bought lotus seeds filling cos' my intention here is just to play around with the dough.... hehehe!  Sorry, I won't be giving the details on how to shape the paus [a bit lazy], so you may have to use your imagination basing on the photos which I'm sharing here.  
     
    Ingredients
    [makes 16 pieces]
    350 gm pau flour sifted together with 1 tsp double action baking powder
    Mix together - 180 ml lukewarm water, 40 gm caster sugar and 1/4 tsp vinegar **
    1 tsp instant yeast
    1 tbsp shortening
    100 gm mashed purple sweet potato [skinned, steamed and mashed]
    ** water reduced to 180 ml from 200 ml cos' of the mashed potato]

    1 tbsp each of toasted black and white sesame seeds [optional]

    Using a Dough Mixer or Hand Knead
    1. Combine all the ingredients [except shortening] in a mixing bowl.  Knead until soft [about 5-10 minutes].  Then add in the shortening, continue to knead until soft, smooth and elastic.  Add in sesame seeds and knead until well combined.  
    2. Shape into a ball and cover to rest for about 20-30 minutes or until double in size.
    3. Punch down dough and remove dough to a floured surface, divide into 2 round balls.   Then divide each ball into 8 equal portions. Shape each into a ball, then roll into flat circle.    
    4. Wrap filling with each flatten dough.  Gather the edges and shape into pleated paus or round balls.  Place on parchment or greased proof  paper in the steaming tray.  
    5. Leave to prove for 15 - 20 minutes or until double in size.   
    6. Steam over high heat for 10-12 minutes in a steamer.  Off heat and leave paus for a further 3 minutes before uncovering to cool on rack. This is to prevent wrinkle, rough skin [sometimes  they may be a little wrinkle - probably because of proofing time but the texture is unaffected].   
      Some photos showing the shaping of the paus


      I'm sharing this post with  Aspiring Bakers #31-Bao Ho-Chiak - May 2013 event hosted by Miss B of everybodyeatswell in Flanders.