Friday, September 13, 2019

GARFIELD [SALTED MUNGBEAN] FIGURINE MOONCAKES [公仔饼]

Came across this recipe on You-tube.  Tried it and my opinion  is, this recipe is a keeper.
The dough is soft and easy to handle.  The mooncakes taste perfect with the salted mungbean paste filling.  You can smell the nice aroma of the mooncakes while airing them.
I have made a double portion of this recipe and managed to get about 50 pieces figurine mooncakes [Garfield design].
Just Baked Mooncakes Before Airing
These mooncakes are without egg glaze after airing
These figurine mooncakes are soft, aromatic and the sweetness is acceptable.  Nice mooncakes.
Recipe adapted from Kathrine Kwa You-tube Figurine Mooncake [猪仔饼#公仔饼 Piggy Mooncakes] - slightly modified
Ingredients
[makes 25 Garfield Figurine Mooncakes]
240 gm golden syrup
75 ml peanut oil
1/2 tbsp alkaline water
300 gm plain flour – sifted
Any doll mooncake molds of your choice
Mooncake Filling
200 gm Salted Mungbean Paste
  1. Combine golden syrup, peanut oil and alkaline water in a mixing bowl. Mix until the ingredients blends well. Set aside for 3 hours [I left mine overnight].
  2. Add sifted flour to syrup mixture lightly until well combined [do not knead the dough]. Leave for several hours [I left mine overnight].
  3. Divide dough into small portions according to the size of the mold used. Roll into round shape and dust lightly with flour [if necessary].  Flatten, place a teaspoon paste in centre.  Roll in round and press it into mooncake mold. Tap to dislodge dough from the mold. Arrange on baking tray lined with parchment paper.
  4. Bake in preheated oven at 180 degrees C [middle shelf] for 15-20 minutes [this is without glazing with beaten egg].   Remove to cool on wire rack for 15 minutes.
  5. Return to oven and bake at 180 degrees C for 15 minutes or until golden brown.
  6. Remove to cool on wire rack then store in container to air them for 1-2 days. The mooncakes will be soft after airing.


Tuesday, September 3, 2019

STEAMED PAUS - LOH HAN VEGETABLES

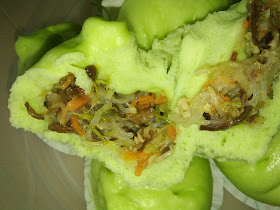
Awesome steamed paus with Loh Han Vegetable Filling.  This is a vegetarian pau recipe.
The pau skin is awesome, pliable dough and easy to handle and pleat when well kneaded.  The skin is soft, smooth and fluffy light.  The sweetness of it blends well with the savoury taste of the mixed vegetable filling.
For this paus, I have tried  to steam them from cold water after shaping with leaving to rest using my multi-purpose cooker/steamer.  The result is so satisfactory.  For this portion, I was able to steam all of it in one go.
 
Ingredients for Pau Skin
[makes 8 medium size paus]
200 gm pau flour
1 tsp yeast
30 gm icing sugar
120-130 ml water [this depends on the 'age' of flour]
1 tsp vegetable shortening
a drop of green pandan paste or colouring
  1. Combined flour, sugar, yeast and colouring in a mixing bowl.  Gradually add in water to form a rough dough.  Knead until well mixed, then add in shortening.  Continue to knead until  smooth and pliable.  
  2. Shape into a ball, dust with some flour to prevent sticking to hand.  Place in mixing bowl, cover to rest for 20 minutes or until double in size.
  3. Punch down dough, then roll into round.  Divide into 8 equal portions, each to roll into balls.  Flatten each one in circle. Flatten the edges, place filling in the centre, gather the edges together or pleat the edges to seal into a pau shape.
  4. Place on parchment paper and steaming tray.
  5. Finish doing the rest.  Place steaming tray over water in the multi-purpose cooker pot.  Cover, turn to high heat.  When water boils, continue to steam for 20 minutes.  Off heat and remove paus after 2-3 minutes.
  6. Cool on wire rack or serve immediately.  ENJOY!!
Recipe adapted from Coco Kong's Cookbook
Ingredients For Vegetable Fillings
150 gm Napa Cabbage or Chinese Cabbage - washed and finely shredded
3 dried mushrooms - soaked and cut into thin strips
40 gm red carrot - peeled and shredded
1 small piece woodear fungus - soaked and finely shredded
2 piece fried beancurd skin or foo pei [soaked and shredded]
30-40 gm glass noodles - soaked and cut into sections]
Seasoning
2 tsp each of salt, mushroom seasoning and sugar [can reduced to 1 tsp, taste to adjust seasoning]
1/2 tsp white or black pepper powder
2 tsp cornflour with 100 ml water
  1. Heat wok with 1/2 tablespoon oil, add in the ingredients and seasoning.  Stir fry to mix well or until limp.  Stir in cornstarch water to thicken.  Dish up and leave to cool before using.  Can prepare and refrigerate until required.


Monday, September 2, 2019

2019 - FIGURINE SESAME MOONCAKES

This figurine mooncake recipe uses more oil with the same portion of flour compared to others.  The syrup used is slightly less.
The dough is a little greasy but easy to handle and mould as it is soft and less gluten if you do not over-mix.  These mooncakes are without egg glaze suitable for vegetarians.  I have added some toasted sesame seeds to the dough.

I have increased the portion to 1.5 [in bracket] as I wanted to finish off my packet of low protein flour.
Ingredients
[makes 24 & 36 small size mooncake mould]
180 ml golden syrup [270 ml]
90 ml peanut oil [130 ml]
1 tsp alkaline water [1 1/2 tsp]
2 tbsp toasted sesame seeds
300 gm plain flour [450 gm]
  1. Combine golden syrup, peanut oil and alkaline water in a mixing bowl.  Stir with a wooden spatula until well blended.  Mix in the sesame seeds.
  2. Sift flour and fold in 2/3 of it into syrup mixture using the cutting method lightly.  Add in the remaining and fold until no sign of white flour.  Cover and leave to rest for an hour or more.
  3. Divide into small portion sufficient to fill the size of the mould used.
  4. Roll each portion into rounds and press onto mould.  Knock out dough and place on baking tray lined with parchment paper.
  5. Bake in a preheated oven at 160 degrees C for 12 minutes.  Remove to cool for 10 minutes.  Returned cooled mooncakes to oven and bake for another 12 minutes or until nicely golden brown.
  6. Remove to cool and leave mooncakes to air for several days before serving.  Store in mooncake containers.