Tuesday, March 31, 2015

Nyonya Heh Kean [Prawn Fritters]

This is a dish we used to enjoy when we were young.  At that time, so long as we get to eat these, there is no question about  whether the fritters are crispy or stays crispy when cooled.  This is because we don’t wait until they are cooled, all were gone fast even before my mom cleans up the wok. We were so eager to enjoy these fritters when it is piping hot and just didn't bother to take any photos on the intersection of these fritters.

Found this simple prawn fritters recipe in Nyonya Flavours.  The batter tasted good and it’s crispy on the outside.  I find this batter good cos’ it is crispy yet still has a bite, not like those which are crispy, crunchy but hard that it hurts when you bite at it.  
Nice.  Now I have a reliable batter recipe to fry prawn fritters [heh kean].
Recipe Source – Nyonya Flavours
Ingredients
250 gm medium or big size prawns – shelled and deveined
Enough oil for deep frying [about 1 cup]
Batter Ingredients
100 gm self-raising flour
25 gm cornflour
¼ tsp salt
1/8 tsp pepper
150 ml water
  1. Combine the batter ingredients in a mixing bowl and blend until smooth.
  2. Add in the prawns and stir to mix well.
  3. Heat oil in a wok or  pan over medium heat.  When oil is hot, scoop a tablespoon of the prawn batter and drop it into the oil.  Repeat to fill the wok or pan.
  4. Fry until the fritters are puffy and golden brown.
  5. Dish out and drain on absorbent paper.
  6. Serve immediately with chilli sauce. 
I'm sharing this post with Cook Your Books Event #21 [March 2015] hosted by Joyce of Kitchen Flavours

 photo 77951578-1914-4b72-8eda-9e40a91183ac_zps331eb4b4.jpg

Monday, March 30, 2015

EZ Smiling Fatt Koh [发糕]

I was never confident when coming to making steamed smiling kuih ['Fatt Koh' or 'Huat Kuih'].  Afraid that they may 'smile' at me when I opened up the steamer.
Anyway, I came across several postings by blogger friends, thus linking this post to 郑慧芬 and Guai Shu Shu who had shared similar recipes.
This recipe is adapted from their posts but with some changes.  Since I was trying it to see if the kuihs really smiled, I didn't made them pandan or gula melaka flavour.  Just plain ones with addition of edible colouring.

Verdict - I was happy that the steamed kuihs did smiled.  The texture is soft and fluffy but I find them moist and dense too.  Is Fatt Koh supposed to be like this?  I'm not sure cos' I don't really fancy this kind of kuih and seldom eat it.
But I sure will make another 2 batches [pandan and gula melaka flavour] for Cheng Beng [Chinese All Souls Day].
Ingredients
[makes 12 cupcakes]
250 gm self raising flour
1 tsp double action baking powder
150 gm castor sugar
200 - 250 ml water [I used 200 ml]
6 pandan leaves - washed and knotted
1 egg - lightly beaten
50 gm melted butter or corn oil
some edible colouring

  1. Boil pandan leaves with water and sugar until fragrant and sugar dissolves.  Remove from heat, set aside to cool.  Discard the pandan leaves.
  2. Lightly beat the egg.
  3. Sieve flour and baking powder into a mixing bowl.  Make a well in the centre.
  4. Add in sugar mixture, egg and melted butter.
  5. Mix to combine.  Divide batter into 3 portions.
  6. Add colouring of your choice to each portion.
  7. Scoop batter into a baking tray lined with paper cases until 95% full.
  8. Steam over high heat for 15-20 minutes or until skewer  when inserted comes out clean.  Remove to cool or serve immediately.
I'm submitting this post to Best Recipes for Everyone March 2015 Event Theme: My Favourite Kuih 
by Fion of Xuanhommama
and co-host by Joceline of Butter, Flour and Me


Friday, March 27, 2015

CARROT MOCK GOLDFISH PAUS

Back from holiday and enjoyed too much of good food.
Here is another pau recipe which I tried from the recipe book below.
These paus turned out well and looks so cute with natural yellow colouring from carrots.
Verdict - the paus are soft, moist and chewy.  You can use any kind of store bought sweet paste filling or make your own but you don't really need much filling for these paus.
Recipe Source - Y3K Book on Paus by Coco Kong
Ingredients
[makes 14-16 paus, dough weighs 500 gm]
250 gm pau flour
1 tsp double action baking powder
20 gm icing sugar [original uses 40 gm]
1 tsp yeast
1 small carrot blend with 130 ml water - strained
20 gm shortening
200 gm lotus paste [I used Pandan lotus paste] about 15 gm]
some red cherries - cut small bits
  1. For The Skin - combine pau flour, baking powder, icing sugar and yeast.
  2. Add in the carrot juice and knead until soft, then add in the shortening.  
  3. Continue to knead until soft and smooth.  Cover to rest for 30 minutes.
  4. Divide dough into 14 or 16 portions.  Shape into balls.
  5. To Shape Paus - Wrap in a portion of the lotus paste. Use your thumb nail and index finger to join up the 2 edges.  Turn the tail end outwards, use a pincer to shape out like a fish-like dough.
  6. Place cherries on the other end 2 sides acting like fish eyes.
  7. Place on parchment paper, cover to proof for 30-40 minutes after making the last pau.
  8. Steam over high heat for 10 minutes or cooked through.
     
I'm sharing this post with Cook Your Books Event #21 [March 2015] hosted by Joyce of Kitchen Flavours

Cook-Your-Books

Thursday, March 26, 2015

Kuih Sago


A kuih made of  sago, commonly seen in kuih shops, Malay snack stalls or gatherings that nevertheless delicious.  The soft, chewy texture, sweet and a little savoury taste as you bite at it, makes you reach for another piece.
This sago kuih can be in any colours or combination of colours but I think the most crucial ingredient is the grated white coconut that makes it tempting.
I have seen many recipes on this kuih and finally found one at Peng's Kitchen which basically is very easy yet the outcome is good.  However, I modified slightly to make it even easier.
Recipe Source - Peng's Kitchen [modified]
Ingredients
300 gm sago
200 gm sugar [I used 180 gm]
600 ml water 
2 tbsp pandan juice [can omit and replace with a drop of green colouring]
1 tsp pandan paste [can omit if you use pandan water]*
1 tsp strawberry paste [can omit and replace with a drop of  pink colouring]
100 gm grated coconut + 100 gm for coating
50 gm gula melaka - chopped 
1/4 tsp salt 
* boil several blades of pandan leaves with the water and use it to cook the sago

  1. Grease a 7" square pan and lined with plastic sheet. Grease lightly again. Set aside. I used the steaming tray of my electric steamer.
  2. Boil sugar and water in a medium pot or non-stick pan. Add in sago can cook till semi-transparent, stirring frequently. Note - theliquid will all be absorbed by the sago and the mixture will be thick.
  3. Scoop 2- 4 tbsp of the cooked sago and mix with the grated coconut, salt and gula melaka.  Set aside.
  4. Divide the remaining into 2 portions. 
  5. Mix one portion with strawberry paste [or pink colouring] and the other portion with pandan juice/pandan paste or green colouring.
  6. Pour the pink mixture into the pan and steam for 15 minutes or until clear. 
  7. Spread the gula melaka mixture over steamed sago, then top up with the green sago mixture over and continue to steam for another 25 minutes or until sago is clear
  8. Cool completely before unmoulding. 
  9. Smear a knife with oil [to prevent sticking] and cut kuih into slices. Coat with extra grated coconut and serve.

I'm submitting this post to Best Recipes for Everyone March 2015 Event Theme: My Favourite Kuih 
by Fion of Xuanhommama
and co-host by Joceline of Butter, Flour and Me

Tuesday, March 10, 2015

Steamed Minced Meat With Salted Eggs

An easy steamed meat dish which is common in most Chinese homes and economy food stalls.
The original recipe uses 3 types of eggs. Since I’m cooking a smaller portion, I omit the century egg.  This dish is still tasty and good served with rice for dinner. Here, I’m sharing the original recipe for your easy reference.
Recipe Source – Hawkers’ Flair Simplified 
Ingredients
50 gm minced meat
3 eggs – lightly beaten
1 century egg - diced
1 salted egg yolk – diced
1 salted egg white
150 ml hot water
½ tsp salt
Dash of pepper and chicken stock granules
Some chopped spring onions
Some fried crispy garlic
1 tsp light soy sauce
  1. Combine meat, eggs, seasoning and water in a bowl. Mix well.
  2. Pour into a 8 inch round steaming tray.
  3. Steam at medium heat for about 10 minutes or until set.
  4. Remove, sprinkle spring onions, fried garlic and light soy sauce.
This will be my last for the time being as I will be away for a short vocation until end month.

Cook-Your-Books
I'm sharing this post with Cook Your Books Event #21 [March 2015] hosted by Joyce of Kitchen Flavours

Monday, March 9, 2015

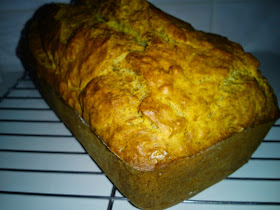
Banana Bread

 
This banana bread was made from the bananas given to me by my mother in-law when I was at her place. She bought lots of fruits and we couldn’t finish it during our stay there. She let us ‘ta pau’ lots of it cos’ there will be no one around to finish eating them after we left.
With so much fruits in the fridge and the bananas getting over-ripe, I had to quickly bake this banana bread instead of letting it rot away.
It tasted good, not too sweet but fragrant. I reduced a big portion of the sugar because these bananas itself is very sweet. 
The bread is moist but the texture is quite compact not like the cake. 
Recipe Source – At Home With Amy Beh [slightly modified]
Ingredients
[loaf tin 18 x 10 x 10 cm]
275 gm over-ripe bananas [I used pisang awak]
80 gm castor sugar [original uses 250 gm]
3 medium size eggs
350 gm plain flour
¾ tbsp bicarbonate of soda
100 ml corn oil
Mix together
100 ml milk + ¼ tsp salt


  1. Grease sides of loaf tin and sprinkle some flour over it. Shake off excess flour.  The bread will have crispy and brown sides.
  2. Sieve flour and bicarbonate of soda. Set aside.
  3. Mix milk and salt, set aside.
  4. In a mixing bowl, mash bananas, add in sugar and beat well until sugar had dissolved.
  5. Add in eggs, one at a time and beat well after each addition on medium high speed. Drizzle in the milk and beat at low speed as you add it. Then drizzle in the corn oil and blend well.
  6. Fold in the flour in batches. Mix well to get a smooth batter.
  7. Pour batter into loaf tin. Bake in preheated oven at 170 degrees C for 10 minutes then reduce the heat to 150 degrees C and continue to bake for 50 minutes or until bread is done when tested with a skewer.
Notes:
For variety, add 50 gm chopped toasted walnuts after folding in the flour [I omit]
Cook-Your-Books
I'm sharing this post with Cook Your Books Event #21 [March 2015] hosted by Joyce of Kitchen Flavours

Photobucket
I'm also submitting this post to Little Thumbs Up Event on Bananas
 hosted by Faeez of Bitter Sweet Spicy